Additional elements in the siding system facilitate the installation, fixing and leveling of the cladding material. This category includes the starting bar for siding. It is placed before starting installation in order to set the correct position and secure the lower strip of material well. With this element, work begins on finishing the facade with vinyl or metal panels.
Description of the starting strip

The purpose of an element is in its name. The bar is fixed on the facade for attaching the first strip of material to it, but the start itself after that will not be visible under the siding. The main parameter of the initial strip is its length, therefore it is selected in the same way as the main size of the panels of the facing material. The standard starting length is 3660 mm, but for steel siding the size of the panels may be different.
Requirements for the starting element and the material of its manufacture:
- the element does not deform from the action of negative temperatures and in hot weather;
- there should be no traces of cracking and corrosion on it;
- in the cold, the material does not harden, does not become brittle, does not crumble into small pieces;
- installation is easy, you can fix the cladding with your own hands;
- the element should not burn, emit harmful components into the environment.
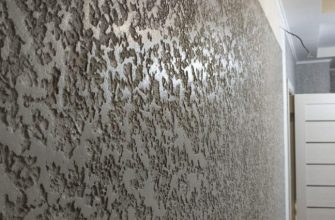
The starting strip is used as a base for basement and wall siding, it is a longitudinal flat element with a certain shape at the top. The upper part of the siding panel is fixed to the crate with self-tapping screws, and the subsequent strips are connected to it by means of a lock connection. The lower part of the first panel is inserted into the start, also snapped into place. The starting element is often just white or any other color.
Starting strips are installed not only at the bottom of the building, they are placed on other sections of the facade:
- when finishing gables, roofs, attics;
- at the beginning of the facing of the overlying floors, if the layer was interrupted by volumetric structures or so it is necessary for a design solution;
- above the protruding plinth at the bottom of the wall.
The correct installation of the start is important in compliance with the technology of work. Be sure to check the horizontalness of the element using a bubble level, and a water tubular level or level is better suited for marking. The crate for the starting profile for siding is made so that it does not bend in the plane, otherwise it will be difficult to snap the first panel onto it.
Any misalignment of the starting bar after several rows will manifest itself on the general plane of the wall. With the onset of frost or heat, the surface will go in waves, the overlapping joints will open, the finish will take on a sloppy look.
Types of starting bars and their characteristics
All initial elements that serve for the subsequent fixation of the first strips of material can be attributed to the category of starting ones.
Common features of all types of starter planks:
- protection of weak sections of the walls from water, the action of other atmospheric phenomena;
- registration of the beginning of the installation;
- basis for further cladding;
- they do not have to be matched by color, since the elements are hidden under the siding.
The types differ in size, shape, configuration, have different names, but they are united by the fact that they are leveled with their help, give direction to the installation of the main finishing siding panels.
Types of profiled strips that are installed before starting the installation of the main cladding material:
- the starting strip is produced in a length of 366 cm;
- the finishing element also has a size of one piece 366 cm;
- J-profile - 366 cm;
- H-profile - 305 cm;
- slope strip for fixing panels to the side of the window - 305 cm.
The starter element is always fixed across the vertical posts of the batten frame on a rigid base. For fixing in a wooden frame, a bar, board or rail is used; a CD-60 profile is used in a metal crate. If a branded subsystem is purchased, the base is provided by the manufacturer.
The finishing profile strip is placed before the fixing of the last finishing siding panel. The whole or cut off top of the strip is brought into it. The longitudinal finish start is also fixed across the vertical frame racks on a rigid base. The installation site is selected so that the last siding panel becomes free into it, without effort and pressure. If the part is fastened with tension, it will burst under load during thermal expansion.
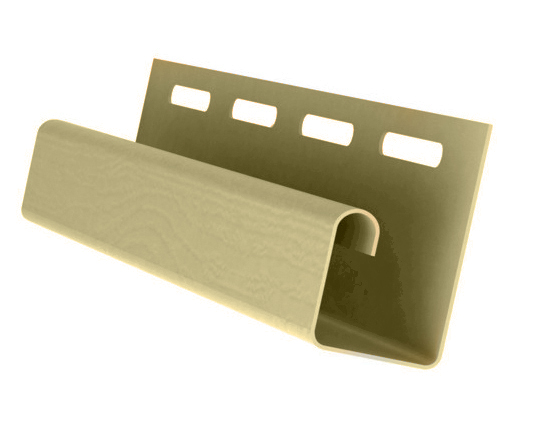
The J-profile is so called because its cross-section is shaped like the corresponding English letter. There are simple and arched planks, which are also installed at the beginning of work. Such extensions are mounted around the perimeter of windows, doors, corners, so that the edge of ordinary siding panels can subsequently be inserted there.
You cannot use the J-profile instead of the starting siding strip at the bottom of the facade and on the plinth - it is not intended to support the wall finishing block, sometimes a strong wind tears off the layer.
The H-profile is used for joining siding panels along the length, if the length of the facade is large. Connecting strips are needed to transition from one finish color to another. Such elements are placed vertically, while their correct position is calculated in order to wind up the ends of the stripes on both sides. For the H-profile, color plays a role, since the middle part of the bar will be visible.
How to set up an initial profile
Rarely, the surface of the basement coincides vertically with the plane of the wall.
Before starting the cladding, the position of the pedestal of the building is determined, which can be of three types:
- flush with the wall;
- protruding forward;
- sinking.
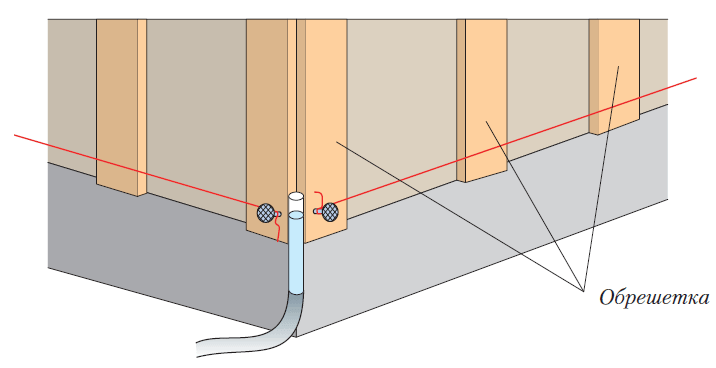
On the facade, using a water level, mark the start fixation line. It is made 40 mm above the line of intersection with the ground along the perimeter of the entire structure. At the marks, nails are hammered into the wall if the siding is attached directly to it.
Between the nails, pull a skip (a thread painted with chalk) and shoot the line of the location of the initial profile for siding. Marks are placed on vertical slats if the material is mounted on a frame.
In the course of work, the following operations are performed:
- From the corner, lay a size equal to the width of the side of the corner profile (usually 75 mm) or the L-profile, if it is provided in the corner. Take into account the clearance for a temperature gap of 2 - 5 mm.
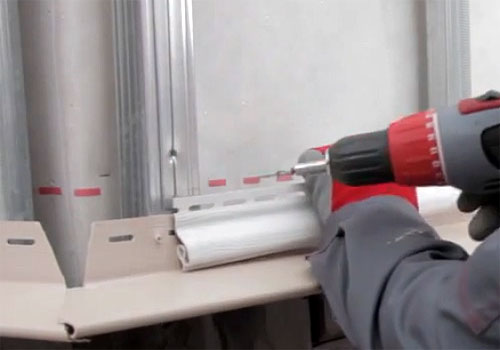
- The start is applied with the upper edge to the marking line, fixed to the slats with self-tapping screws. There are holes for hardware on the additional strip. The top should line up with the print of the cord on the wall or frame rails.
- During installation, leave gaps between the ends of the strips of about 5 - 6 mm so that they expand freely when the temperature changes. After fixing the self-tapping screw, the bar must be moved along the sides, at the end returning to its original place.
Self-tapping screws are inserted in the center of the oval-shaped hole to compensate for the expansion, they are not screwed to the end by 1 - 2 mm. The starting elements are mounted in the same way along the entire perimeter.
Slope strips are placed on those sections of window and door slopes, the recesses of which need to be blocked. They are screwed on in a free order.
Installation technology with protruding plinth
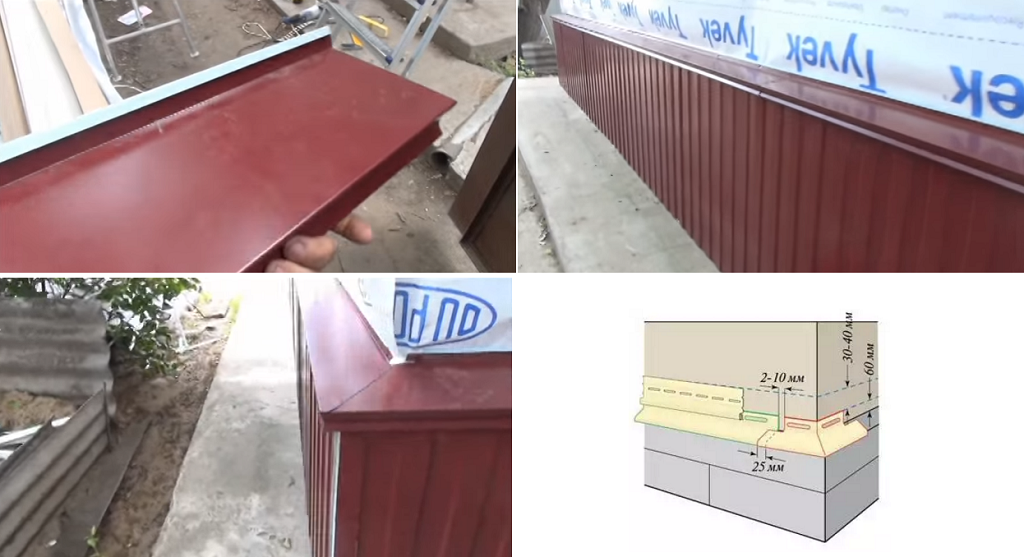
The protruding pedestal of the building must be protected from moisture, therefore it is protected by a hinged ebb. A vinyl or steel profile is used, which is mounted before fixing the start.The width of the low tide is chosen so that it overlaps the extension of the base by 1 - 2 cm, together with the outer trim under it. Before attaching the ebb, the horizontal top of the base is leveled and treated with an antiseptic, then a primer.
To install the initial siding plank:
- To set the start, beat off a horizontal line with a cord around the entire perimeter of the house at a height of 60 mm (standard height of the start strip) from the top of the low tide. This allowance will ensure that the top of the ebb and the bottom of the cladding layer match without gaps.
- If the cord is not coated, it can be left on the wall as a guide, but it is important to avoid sagging.
- Before fixing the starting strip, check the horizontality of the crate so that there are no protruding and sinking racks.
- The start strip is aligned with the top edge line. At the corners, the width of the side of the corner profile is noted, taking into account the gap. From this mark, they begin to fix the start.
- A gap of up to 6 cm is left between adjacent initial strips. After fixing the first extension, check its horizontality, direction along the facade, so that further elements are placed in the same way.
The initial elements form the basis for fixing the entire finish; it will no longer be possible to align them after the start of fixing the main panels.
If joining on the walls of siding of different colors is provided, before and after the H-profile, start strips are mounted for each section separately. Similarly, set the start when trimming the pediment, if the facade finish was interrupted by a horizontal ebb.