When deciding to build a house, every developer would like to see it not only durable and comfortable, but also spectacular, standing out among the buildings standing nearby. As a rule, his attention, as well as the attention of architects developing a project for a new building, is drawn to the roof, the appearance of which largely determines the overall appearance of the building. At the same time, a multi-pitched roof looks especially catchy, one of the varieties of which is a hip roof.
Design features
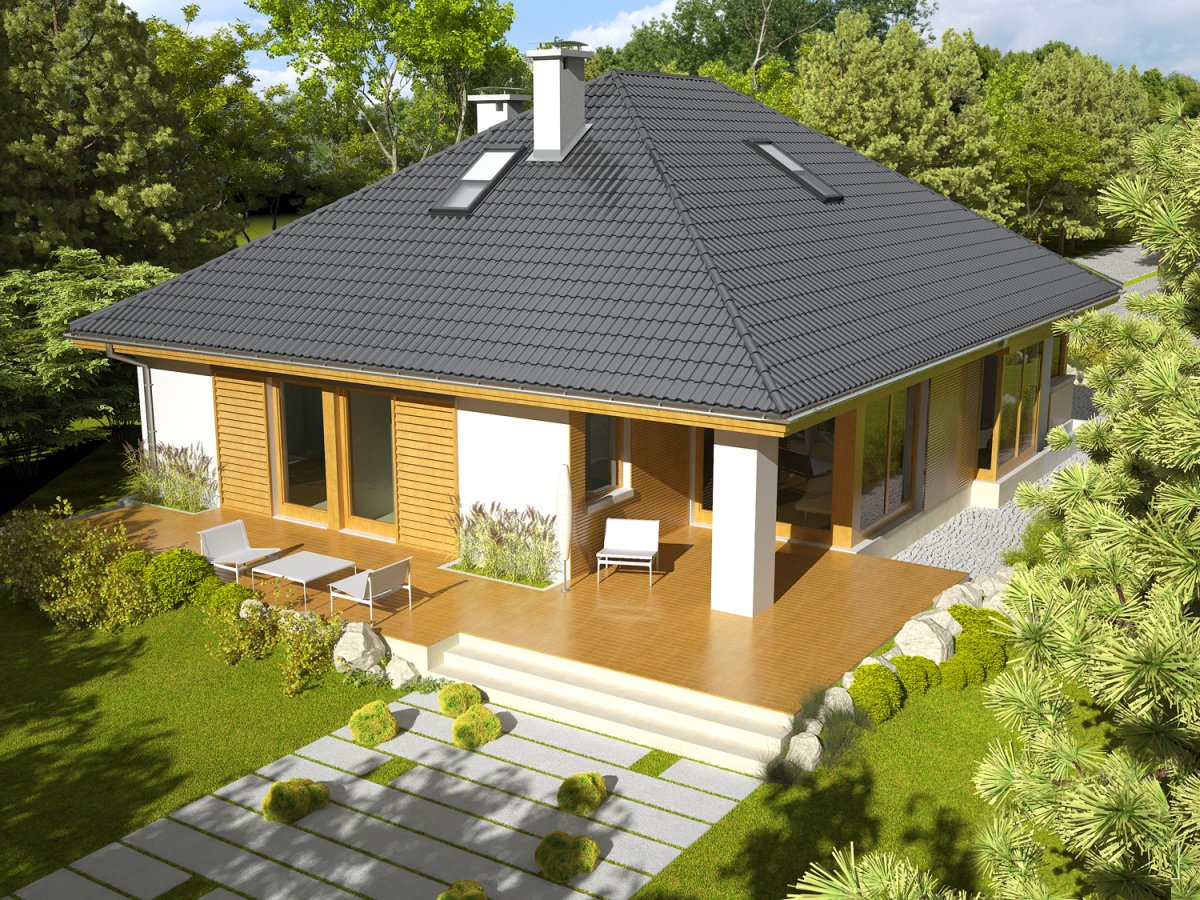
In the general case, a hip roof is a four-pitched rafter system, in which the end (short) slopes are in the shape of a triangle, and the longer ones are made in the form of a trapezoid or triangle. And if the adjacent slopes of such roofs are limited by inclined ribs with an external angle, they are called hip.
The hip roof differs from traditional (gable) structures by the absence of gables, which excludes the presence of straight windows in it. To ensure proper lighting and ventilation of such attic spaces, window openings on hip roofs are made inclined. In addition, hip roofs are characterized by a high slope angle. Thanks to this, houses with such a roof effectively stand out against the background of other buildings.
Varieties of hip roofs
There are several types of hip roofs:
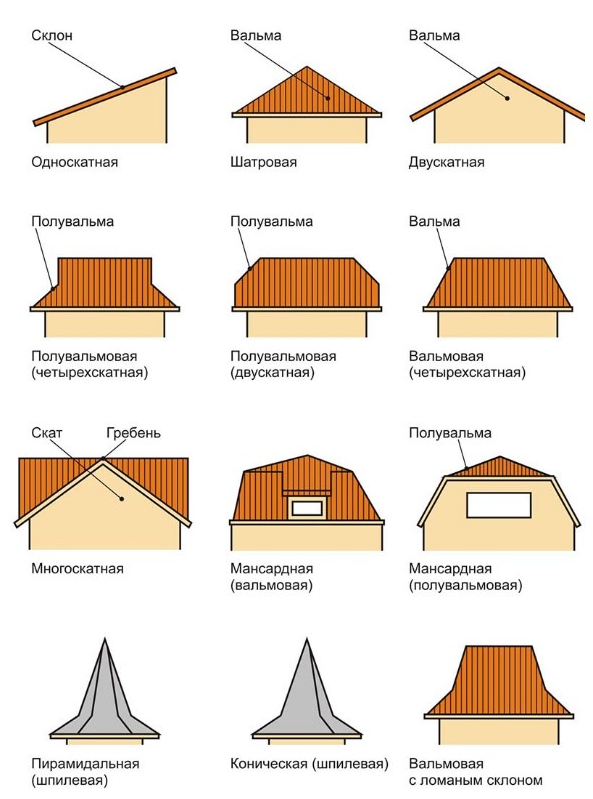
- Classic four-slope construction, which uses straight rafters, hips extend from the ridge of the roof. The overhangs of such a roof are located at the same height.
- Sloping roof, in which the ramps are of different sizes and are located at different angles. This design is distinguished by a more rational use of the area of the inner attic and looks more solid. However, its design and installation is much more complicated and more expensive than the classic version.
- The hipped roof is mounted only on a square building. Moreover, all of its slopes are made in the form of identical isosceles triangles, and all hips converge at one point.
- The semi-hinged Dutch roof has shortened end slopes that do not reach the middle of the side slope. This makes it easy to install vertical windows in the attic.
- Semi-hip Danish roof, characterized by the presence of vertical gables, below which the end slope is located. The originality of the design is given by triangular windows that act as gables.
- L-shaped hip design, which is characterized by the presence of 4 slightly inclined slopes, perpendicularly connected to each other. Such a connection gives the roof the shape of the letter G. Angular roof, or as it is sometimes called - L-shaped, is used in cases where it is necessary protect the house from strong winds and direct sunlight.
Each version of the hip roof has its own advantages and disadvantages. They also differ in appearance. The choice of the final version depends solely on the aesthetic taste of the customer and how he sees his future home.
The functionality of the hipped roof
Despite the certain complexity of design and arrangement, hip roofs are very functional.
- The absence of vertical walls and reliable fastening of modern roofing materials to the rafter system ensures high resistance of the hip roof to a strong air flow. Therefore, their construction is recommended in regions where strong winds are characteristic.
- Roofing hips (corner ribs) have increased rigidity compared to a gable roof, and therefore are resistant to adverse weather conditions (heavy rainfall, snow “caps”).
- Large overhangs that can be installed around the entire perimeter of the hip roof will reliably protect the facade of the building from getting wet.
- Due to the same and sufficiently large surface area of the roof slopes, the attic equipped with a hip roof warms up evenly, creating a comfortable temperature regime in the room.
The cost of erecting a hip roof is higher than that of a gable roof. The design of a rafter system is more complicated than traditional systems, therefore, it requires the involvement of specialists with the necessary knowledge.
The under-roof space of the hip roof is significantly less than the volume of the attic spaces of single or double-pitched roofs. Therefore, in attics, equipped with a hip roof, it is somewhat more difficult to place furniture and household appliances.
Device and calculation of elements
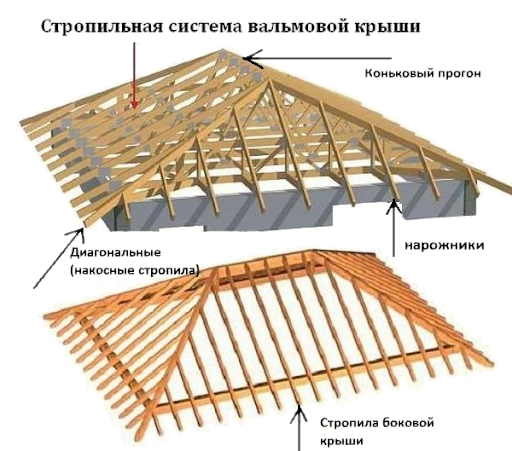
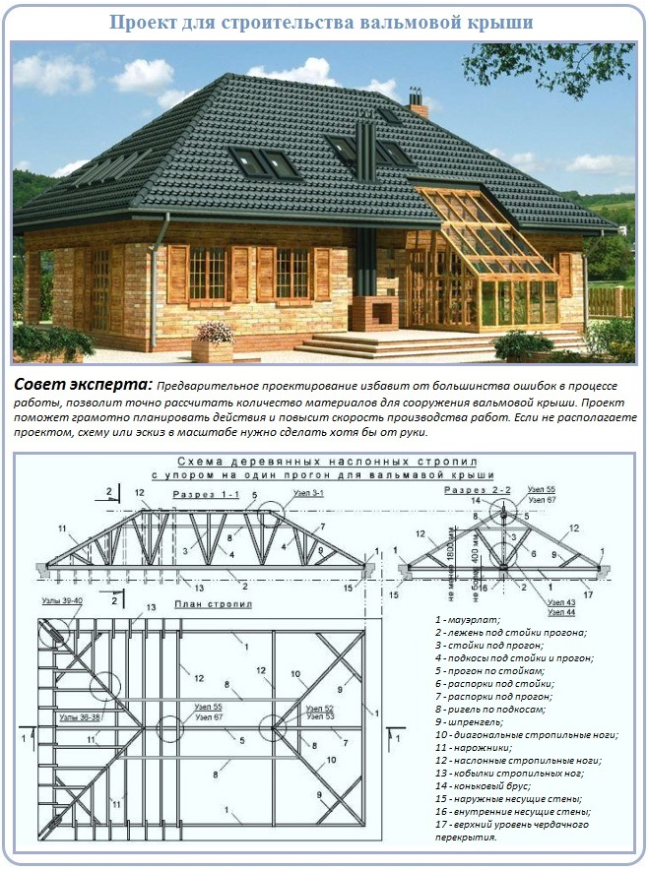
- oblique (diagonal) rafters connecting all corners of the structure with the ridge bar;
- short rafters (rafters), coming out at one angle and fixed on the rafters;
- intermediate central rafters that form the frame of the structure.
The role of the main bearing axis of the entire roofing system is played by the ridge beam (upper part of the roof).
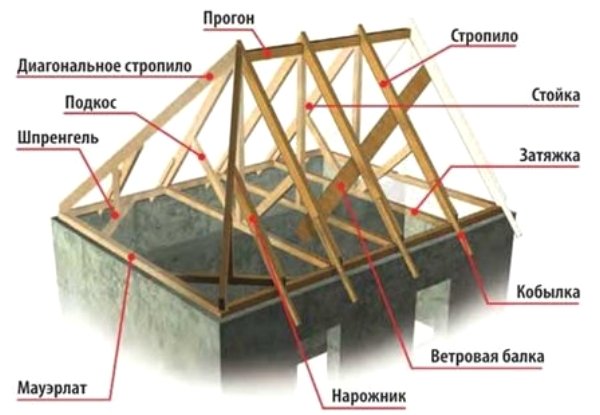
- racks supporting the ridge - they are installed at the junction of two rafters and a ridge bar; if it is planned to equip a dwelling in the under-roof space, the racks are replaced with other retaining elements;
- puffs - elements that act as an attic floor and at the same time fastening the rafters;
- filly - attached to the rafters and allow you to lengthen the roof overhangs;
- wind beam - attached to the rafters from the windward side of the roof;
- mauerlat - bars installed along the entire perimeter of the walls of the building;
- sprengels - mandatory elements that add additional rigidity to the entire structure; they are installed diagonally relative to the corners of the house and attached to the Mauerlat;
- struts - used when the under-roof space is not planned to be used as a living space.
Run - the distance between the fastening of the rafters to the ridge beam. Depends on the selected roof material and the estimated weight of the snow cap.
Calculation of the elements of the rafter system
- the dimensions of the girders between the rafters;
- angles of inclination of roof slopes;
- section of wooden elements of the truss system;
- the geometric dimensions of the available protrusions, chimneys, ventilation and window openings;
- operational characteristics of the foundation and load-bearing walls of the building.
After developing a diagram of the rafter system, they begin to calculate the exact proportions of structural elements. The calculation is carried out according to specially developed formulas, due to which the roof will be strong and reliable.
In these formulas:
- S is the total area of the roof slopes;
- h is the height of the rafter system from the ceiling to the ceiling;
- d is the length of the diagonal rafters;
- e is the length of the intermediate rafters;
- a - the distance between the rafters along the length of the ridge bar;
- α is the angle of inclination of the slope;
- b is the distance between the rafters from the front side.
The formulas given can be used only when calculating the simplest options for hip structures.It is better to entrust the development of drawings of a rafter system with a more complex structure to qualified specialists.
DIY hip roof construction
- hammer with a nail puller;
- a wooden or rubber hammer;
- screwdriver;
- marker;
- hacksaw (electric saw, jigsaw);
- plane;
- chisel;
- building level and plumb line;
- roulette.
The choice of materials must be approached with special care. In addition to high-quality, well-dried wood, you will need:
- a wide range of fasteners (brackets, corners, fastening and connecting plates, mounting profile and much more);
- roofing material;
- insulation;
- vapor barrier film;
- windproof film;
- sheets of plywood or OSB for decking under the roofing material (if necessary);
- antiseptic for wood processing;
- steel wire for fastening the roof elements to the load-bearing walls of the building.
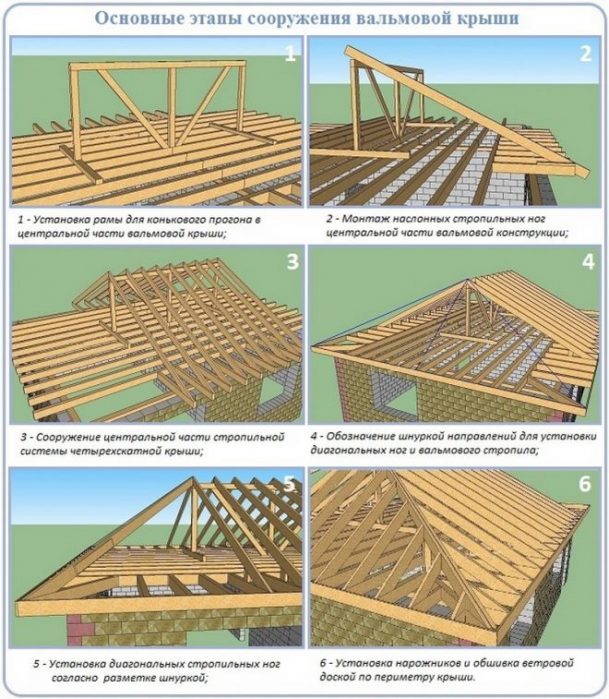
The installation of the rafter system is carried out strictly according to the developed scheme. As a rule, these works begin with the installation of the Mauerlat and end with the installation of the worms, which are lengthened by the filly at the final stage.
Decking of roofing material
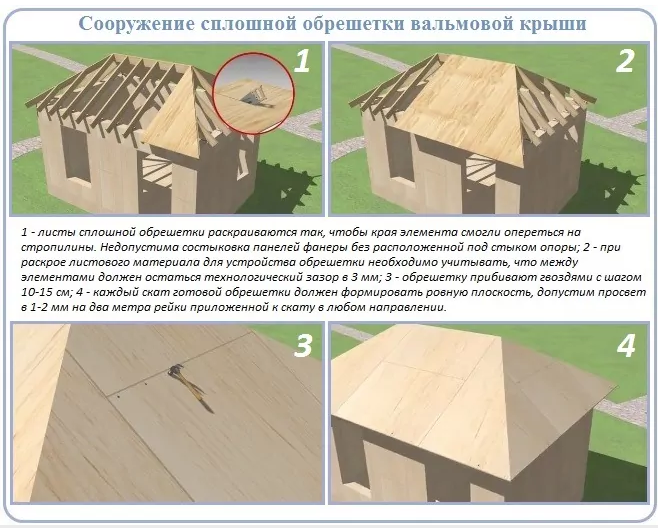
- A vapor barrier film is attached to the rafters.
- The lathing slats are screwed on top of the film.
- Insulation is laid between the battens of the crate, which is covered with a windproof film.
- A counter-lattice is laid on top of the "pie".
Further work is carried out depending on what material is selected for the topcoat. If a metal tile is chosen, it is screwed directly to the counter-lattice slats. If soft materials are used, sheets of plywood or OSB are laid under them.


