Polycarbonate awnings in the courtyard of a private house are increasingly common today. These are inexpensive and practical structures that have a wide range of applications as shelter for people and their property from external factors. Polycarbonate is highly durable, flexible and transparent. With the right choice of materials and the ability to use household tools, you can easily create beautiful translucent structures of any complexity.
Material description
Polycarbonate awnings in the yard look great. The design of structures is largely determined by the choice of material for the roofing.
The following types of panels are on sale:
- Monolithic. Produced by extrusion of molten raw materials. The finished slabs, in comparison with silicate glass, have the same transparency, flexibility and many times higher strength. The products are produced in the form of smooth and corrugated slabs that follow the configuration of a conventional slate. Monolithic sheets are used wherever increased reliability is required. The polycarbonate carport in front of the garage is guaranteed to protect people and cars from hail, large and solid objects. The standard size of the slabs is 105x205 cm.
- Cellular. They are two or more plates connected by longitudinal stiffeners. The strength and transparency of such slabs is somewhat worse than that of monolithic ones, but they are much more ductile and lighter. This allows you to make spectacular structures with roofs of the most varied and bizarre shapes. Panels are produced with a format of 210x600 cm.
Complete with polymer sheets, it is recommended to purchase pipes for the frame, connecting, end and wall profiles, self-tapping screws with a drill and a silicone washer. Modern technologies make it possible to install polycarbonate awnings as quickly and efficiently as possible.
Types of awnings
Each type of polymer boards, depending on the structure, has its own indicators of flexibility.
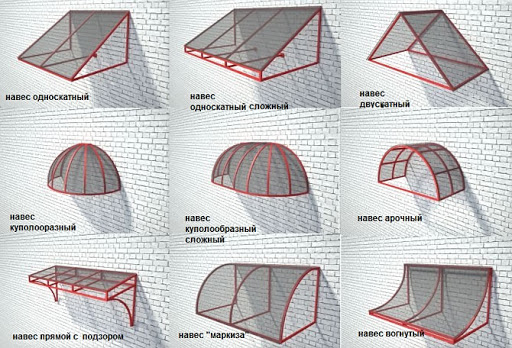
The panels can be used to create roof structures of the following shape:
- Shed. Usually they are made in the form of adjoining pavements where the greatest snow loads are expected. As a rule, with the help of straight sheets, the visor of the porch and garage block is equipped.
- Gable. They are two flat planes connected at an angle. The structures are easy to assemble, strong, but do not shine with presentability.
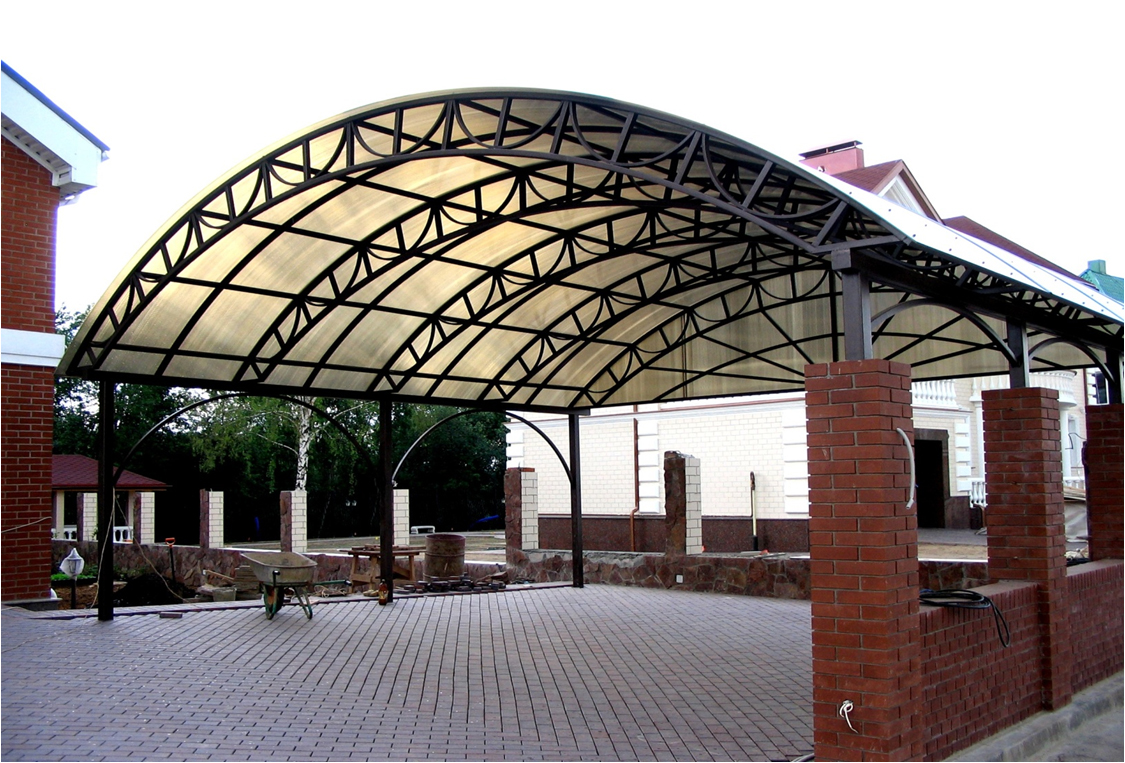
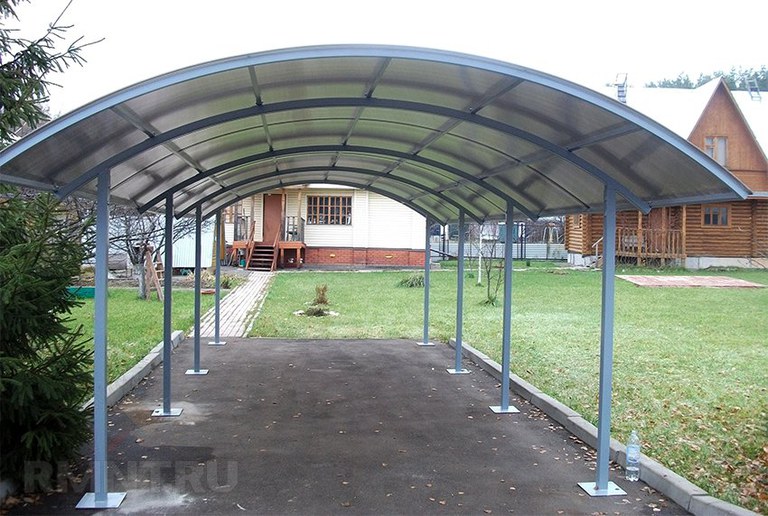
- Arched. The most popular solution and is great for single and combined awnings. The roof combines practicality and attractiveness.
- Conical. Some of the most difficult projects to complete. When finished, they look like a dome with a sharp or rounded top. The structures are practical and personable.
- Difficult. Such roofs consist of convex and concave fragments passing into each other, which looks expensive, interesting and extremely presentable.
The choice of construction is determined by the design of the site, the dimensions of the canopy and your own building skills.
Drawing up a drawing taking into account the peculiarities of the application

The first step in the construction of a canopy is to determine its purpose and dimensions. The optimal value is considered to be a protrusion of 100 cm in each direction from the perimeter of the object, over which the roof will be installed. Based on this, the construction site is determined and a detailed drawing is drawn up.Details such as the architecture of the courtyard buildings, climatic conditions and possible stress on the structure must be taken into account.
The project must specify in detail the following conditions:
- base for the supporting structure;
- material of manufacture and parameters of supports;
- configuration and characteristics of the battens in relation to the format of the slabs;
- frame shape;
- fixing scheme for profiles and panels;
- decorative elements.
On the basis of the plan drawn up, an estimate is made and preparatory measures begin.
Materials and tools
To build a canopy for a private house made of polycarbonate with your own hands, you will need the following tools:
- welding machine;
- Bulgarian;
- screwdriver;
- electric drill;
- a circular saw;
- level;
- a hammer;
- roulette;
- square;
- shovel;
- spanners;
- paint brush;
- scissors.
List of materials:
- polycarbonate;
- profiles for stacking sheets;
- sealant;
- perforated tape;
- material for the frame and supports;
- mixture for concreting.
A separate issue for craftsmen is the choice between honeycomb and monolithic plates. Their composition is the same, but the structure determines the performance and scope. The monolith is more expensive, stronger, but bends poorly. Honeycomb panels are lightweight, pliable, but grow cloudy over time due to the formation of condensation in the cavities and their contamination. To create transparent roofs, solid sheets with a thickness of 2-4 mm are selected. The best option for honeycomb plates will be products with a thickness of 8-12 mm.
Preparation of the base
If a free-standing canopy is made, a platform is arranged under it.
The sequence of this process:
- Marking. Cleaning the site from vegetation and foreign objects.
- Excerpt from the foundation pit. The depth of the pit is determined by the type of coverage selected.
- Drainage laying. First comes geotextile fabric, then crushed stone and sand.
- Installation of the site. It is produced according to the technology corresponding to the coating.
Base materials can be as follows:
- Concrete slab. Formwork, reinforcement and mortar are used, poured in height by 5-10 cm. The finished surface is polished, tiled or covered with wooden flooring.
- Paving slabs. Stones are laid in a contour of borders with sand or stone screenings poured into it. Alternatively, you can use paving stones or clinker bricks.
- Lawn. The choice is made in favor of artificial or live rolls. A grate must be laid on top of the grass, the function of which is to protect it from trampling.
Each project has its own characteristics, the choice is made according to the tastes of the owners.
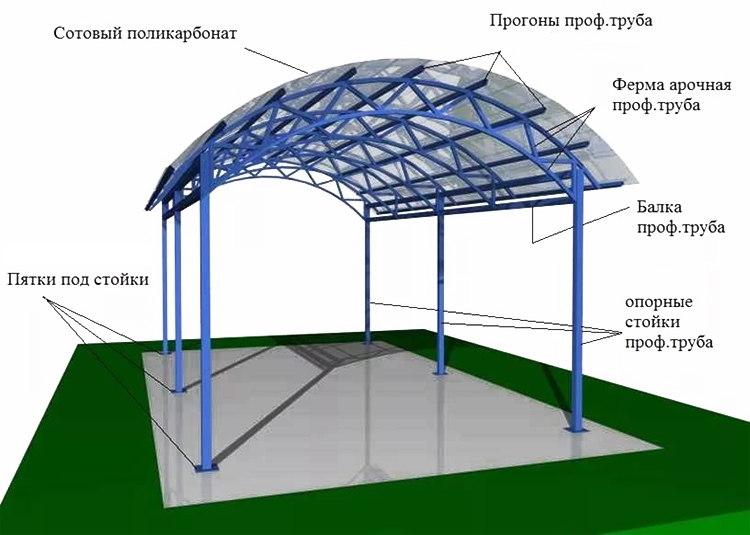
Assembling the frame
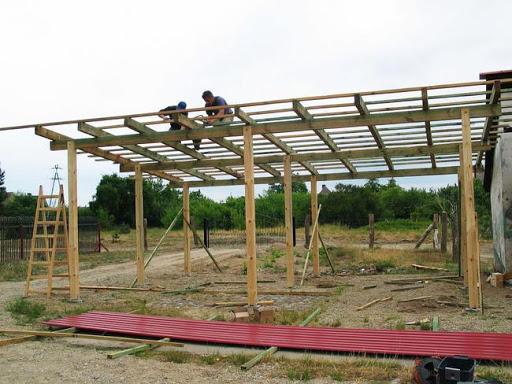
The frame is a structure consisting of a rafter system and supports that evenly distribute the load on the ground. The frame can be made of wood or metal. The tree is only suitable for even slopes, steel profiles are universal, they can be given any shape.
The sequence of mounting the frame:
- Installation of supports. Holes are made, crushed stone and sand are poured into them and rammed. Before immersion, the poles are treated with an anti-corrosion and decay agent. After lowering into the pits, the supports are leveled and concrete is poured. Supports are placed, which are removed after the solution has solidified.
- Installation of the upper trim. A profile is fixed on top of the pillars, after which the structure gains strength, stability and solidity. Sometimes cross-members are placed between the posts, which serve as fences and railings.
- Manufacturing of the rafter system. In curved structures, arcs are attached to the strapping, in pitched roofs, a ridge bar is additionally installed. The step between the profiles is taken as a multiple of the width of the panels and is 70 cm.For slabs thicker than 8 mm, it can be increased to 105 cm.
After assembly, the frame is cleaned of dirt, rust, sagging and welding scale. The structure is treated with anti-corrosion agents and painted in the selected color.
How to bend a profile

At home, this can be done in the following ways:
- Undercuts. On one side of the pipe, the grinder makes the same triangular cuts. Then the workpiece is bent, the seams are tacked by welding, after which they are polished and painted over. The curvature is not perfect, but is compensated by the sealing tape.
- By heating. A blowtorch, gas torch or muffle furnace is used. After heating to red, the iron becomes soft. The heated profile is applied to the piece and left on it until it cools down and takes on a new shape.
- By passing through the machine. A mechanical or electric pipe bender is used. The machine can be bought or made by hand.
The choice of bending method is determined by the availability of equipment, fixtures and your own preferences.
Coating installation

The sequence of laying polycarbonate:
- Layout of slabs and cutting them into workpieces of a given size. This should be done either with a sharp knife or a low-speed electric tool with frequent, fine, undiluted teeth. The base for the slabs must be flat and smooth.
- Installation of profiles. In accordance with the project, parts of the connecting and supporting type are used. In other places, a seal is glued to the frame.
- Slabs fitting, fitting and fixing of their ends in profiles. Drilling holes in polycarbonate with incidental removal of chips from the honeycomb. The wells should be 3-4 mm wider than the diameter of the self-tapping rod. The distance between them is taken within 30-40 cm.
- Screwing the sheets to the frame. Self-tapping screws must be placed at right angles and tightened not to the end, but so that there is slack for the slabs to slide during thermal expansion.
Finally, perforated tape is glued, plugs are installed on the connectors and end profiles on the edges of the slopes.


