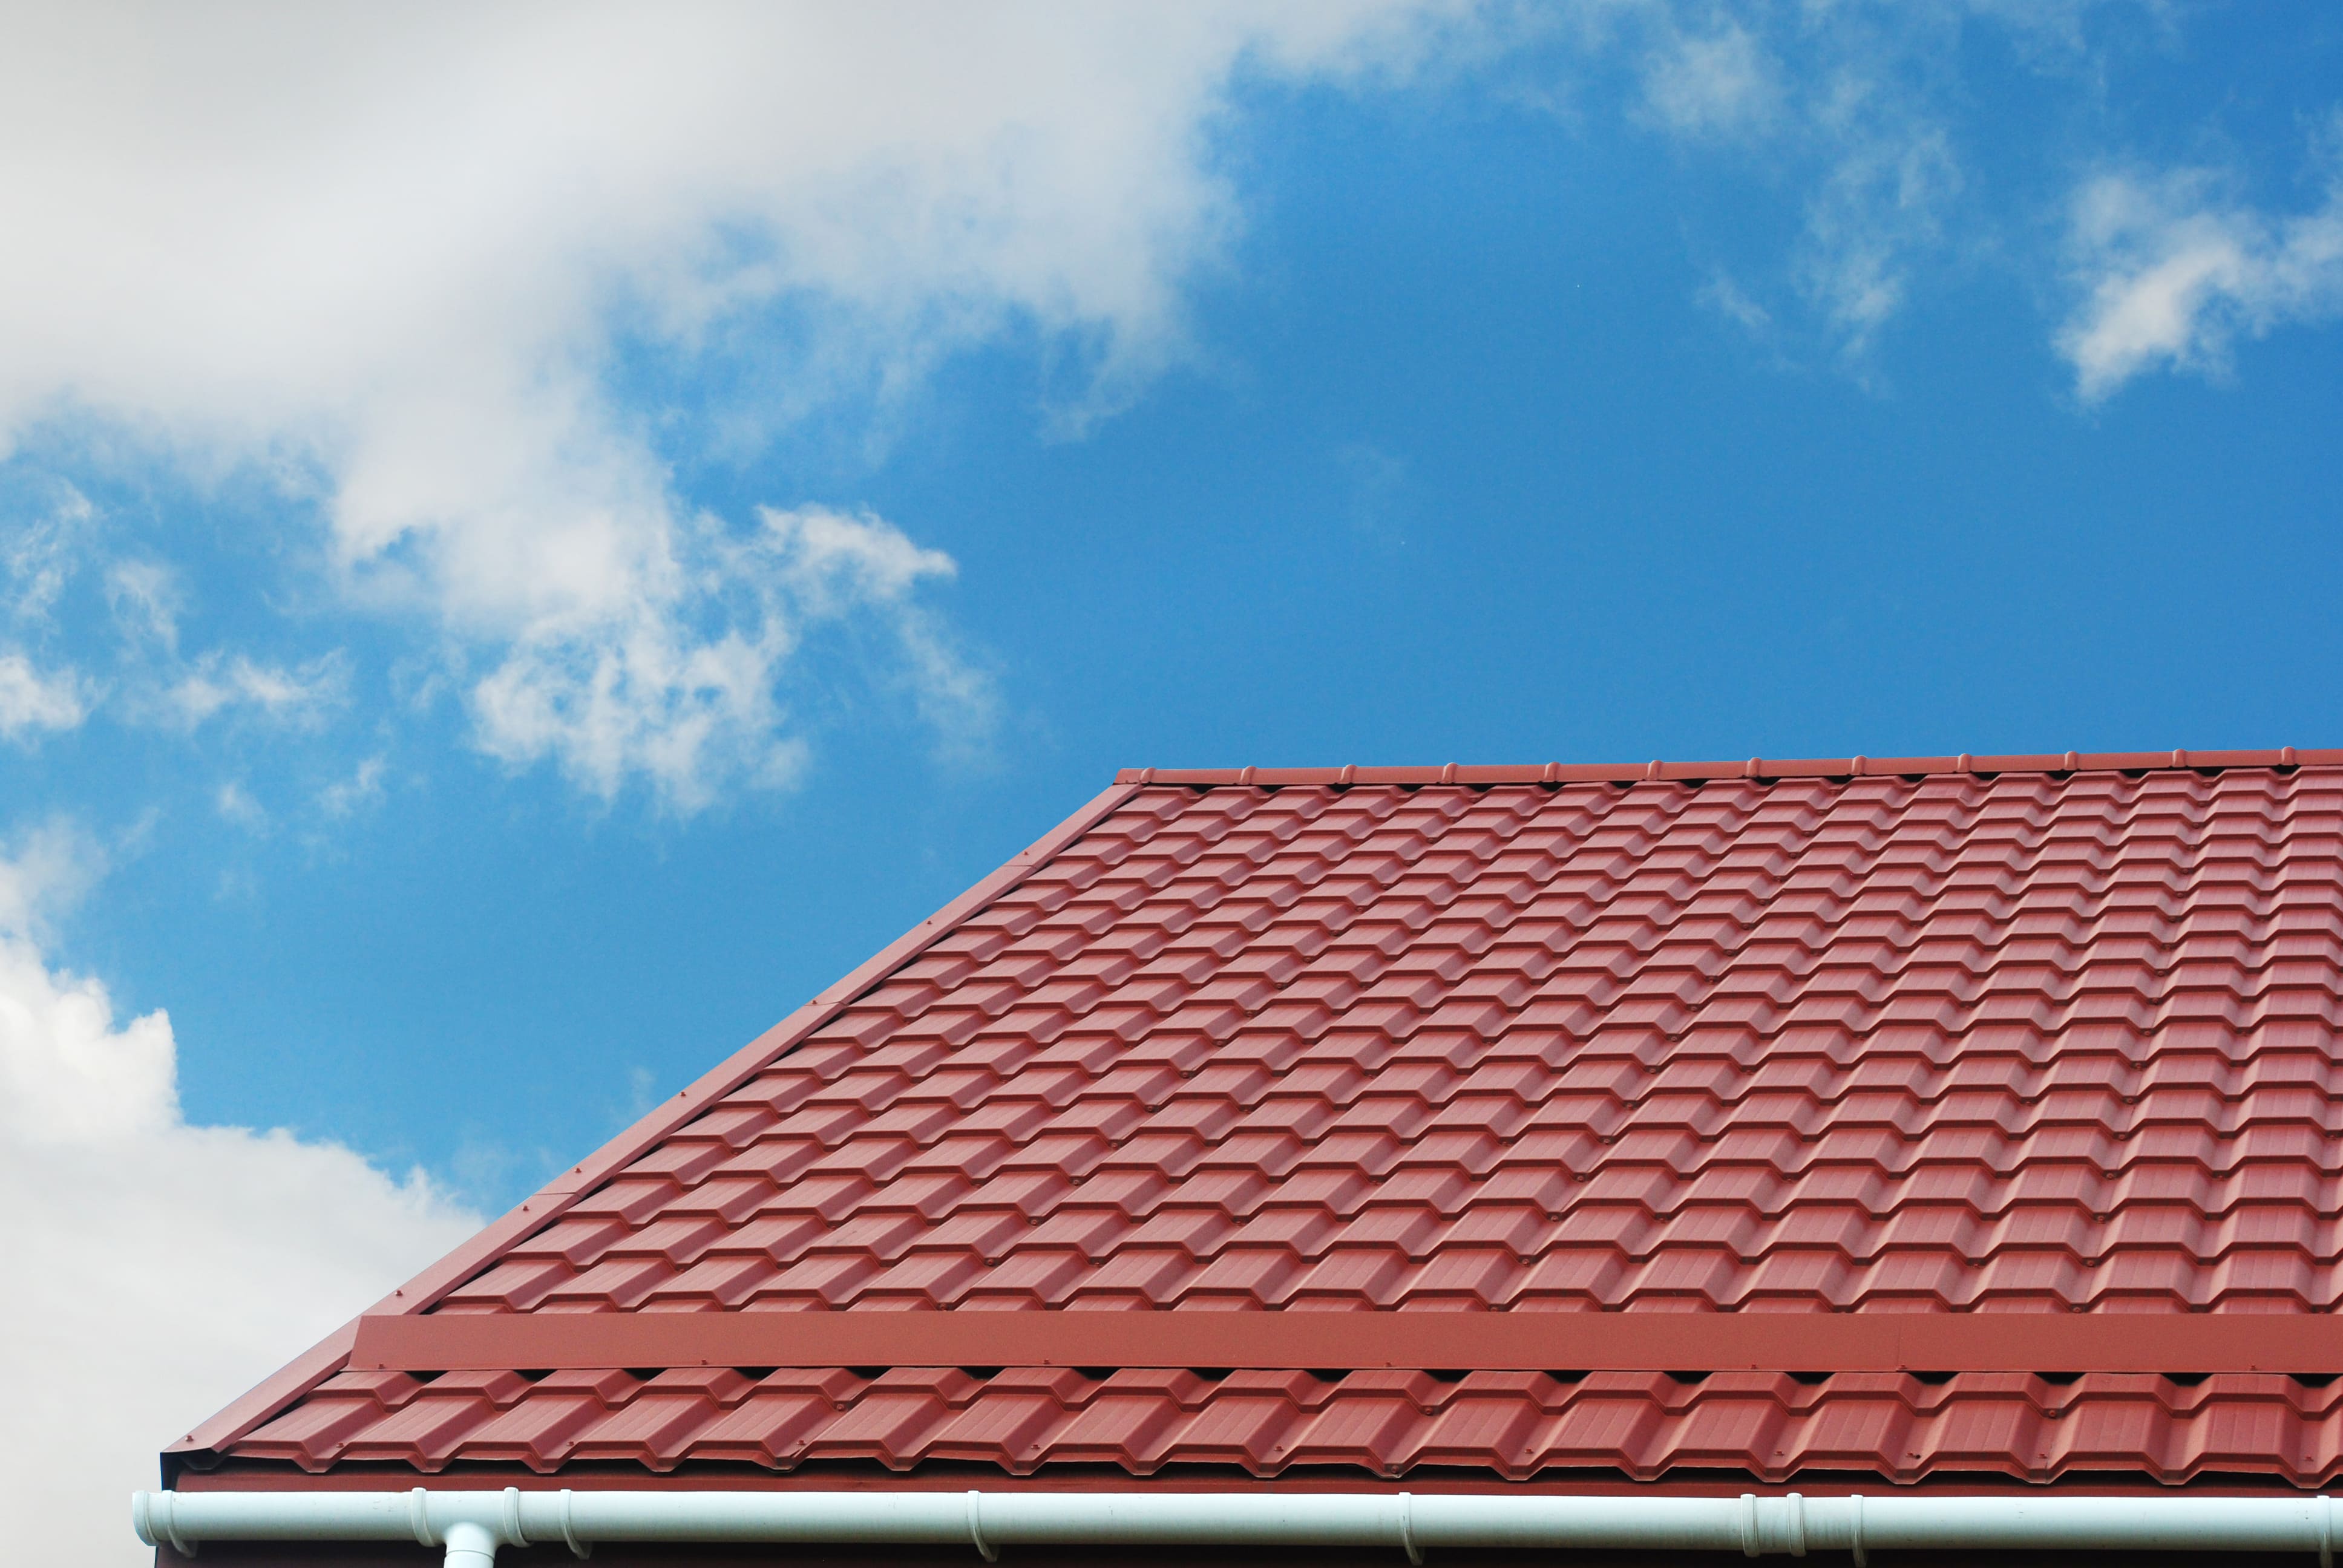
With its consumer properties and technical characteristics, metal tiles are gaining more and more popularity among private developers and construction companies. Installation of metal tiles is carried out on their own or entrusted to specialists. It is important to properly prepare for the work and study the nuances of installing the sheets so that the roof lasts a long time.
- Required tools and consumables
- Additional elements
- Roofing cake structure
- Surface preparation for the installation of metal tiles
- Step-by-step instructions for installing the crate
- Installation of parts before laying metal tiles
- Installation of eaves and overhangs filing
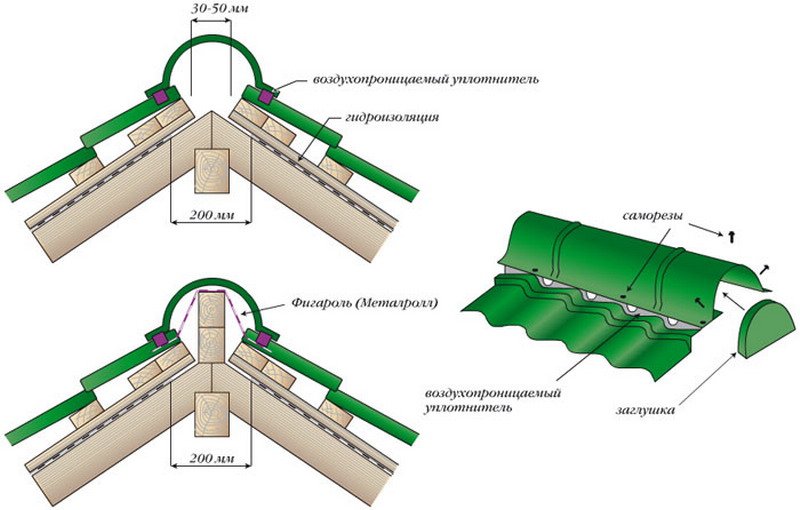
- Installation of the valley
- Installation of the abutment bar
- Rules for stacking sheets
- Sheets to size
- If the sheets are shorter than the slopes
- Features of covering one- and two-pitched roofs.
- Fixation of metal tiles
- Modular roof tiles
- Final work
- Common mistakes
Required tools and consumables
The right tool is the key to fast work and high-quality installation.
The roofing screws are screwed in with a screwdriver. When choosing, they pay attention to the completeness of spare batteries and the speed of charging the batteries. If the batteries are old, you will have to recharge regularly, staying idle for a while, which increases the installation time. The optimal battery capacity is from 1.5 to 2 Ah.
The screwdriver must operate in two modes of speed for tightening screws and drilling metal. Models with a torque of 30 Nm or more are selected. An obligatory function is to limit the force, this will help protect the metal from deformation.
Manual or electric scissors for metal. For convenience, choose models for the working hand. Professionals prefer electric die-cut models, but it is not profitable to buy them for installing metal tiles on one object.
A grinder is not used for cutting elements, since the protective layer is destroyed under the influence of temperature, and accelerated corrosion of the metal begins.
It is advisable to use one tape measure for the whole complex of works, different models may differ, which is fraught with spoiled sheets.
You will need a metal hammer and rubber mallet to trim the sheets.
A pencil, marker and a long steel ruler are used to mark the cut.
A staple gun is used to attach a vapor barrier material.
A knife for cutting insulation and vapor barrier must be sharpened or have replaceable blades.
It is necessary to fix the metal tile with special roofing screws. They usually have a hex head and a rubber gasket with a washer to prevent water from seeping into the holes.
The edges of the sheets damaged during cutting are tinted with aerosol paint, matched to the color of the sheet.
Double-sided metallized tape is used to seal sections of vapor and waterproofing film.
The joints of additional elements and metal tiles are sealed with special mastics or insulating adhesive tapes.
Additional elements
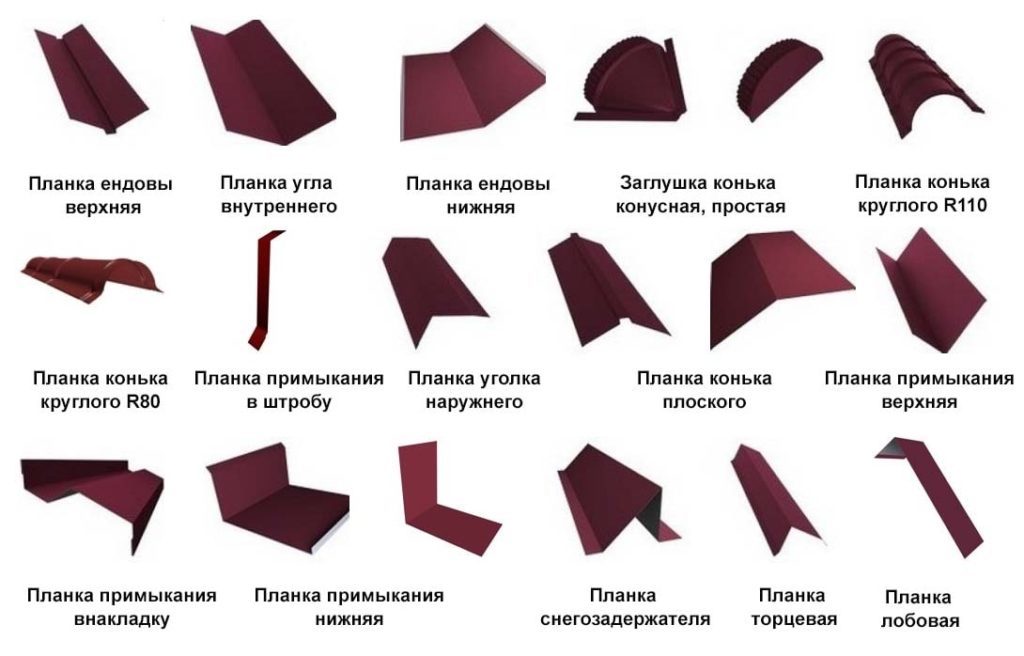
The laying of metal tiles can be carried out without additional details, but in order for the roof to have an attractive appearance and perform insulating properties, additional elements are acquired.
The roof top is protected with ridge or barrel strips. In addition to the aesthetic design, the ridge protects the roof from dust and insects, moisture.It is a ventilation element between the waterproofing film and the tiles.
To connect the wall and the roof, abutment strips are used, for example, in the case of a pipe bypass or for the roof of a veranda.
The cornice strip forms the cornice and serves to drain condensate into the drain.
The end (pediment) strip is necessary for sealing the end overhangs, it is an additional element of reinforcement so that the sheets are not blown off by the wind.
The endova serves to connect and seal the inner and outer corners. For greater strength, the inner valley is attached to the crate, then the sheet, and the upper valley is attached on top.
Snow holders prevent snow from rolling off the roof, which can injure people and damage property, and protect gutter pipes.
Roofing cake structure
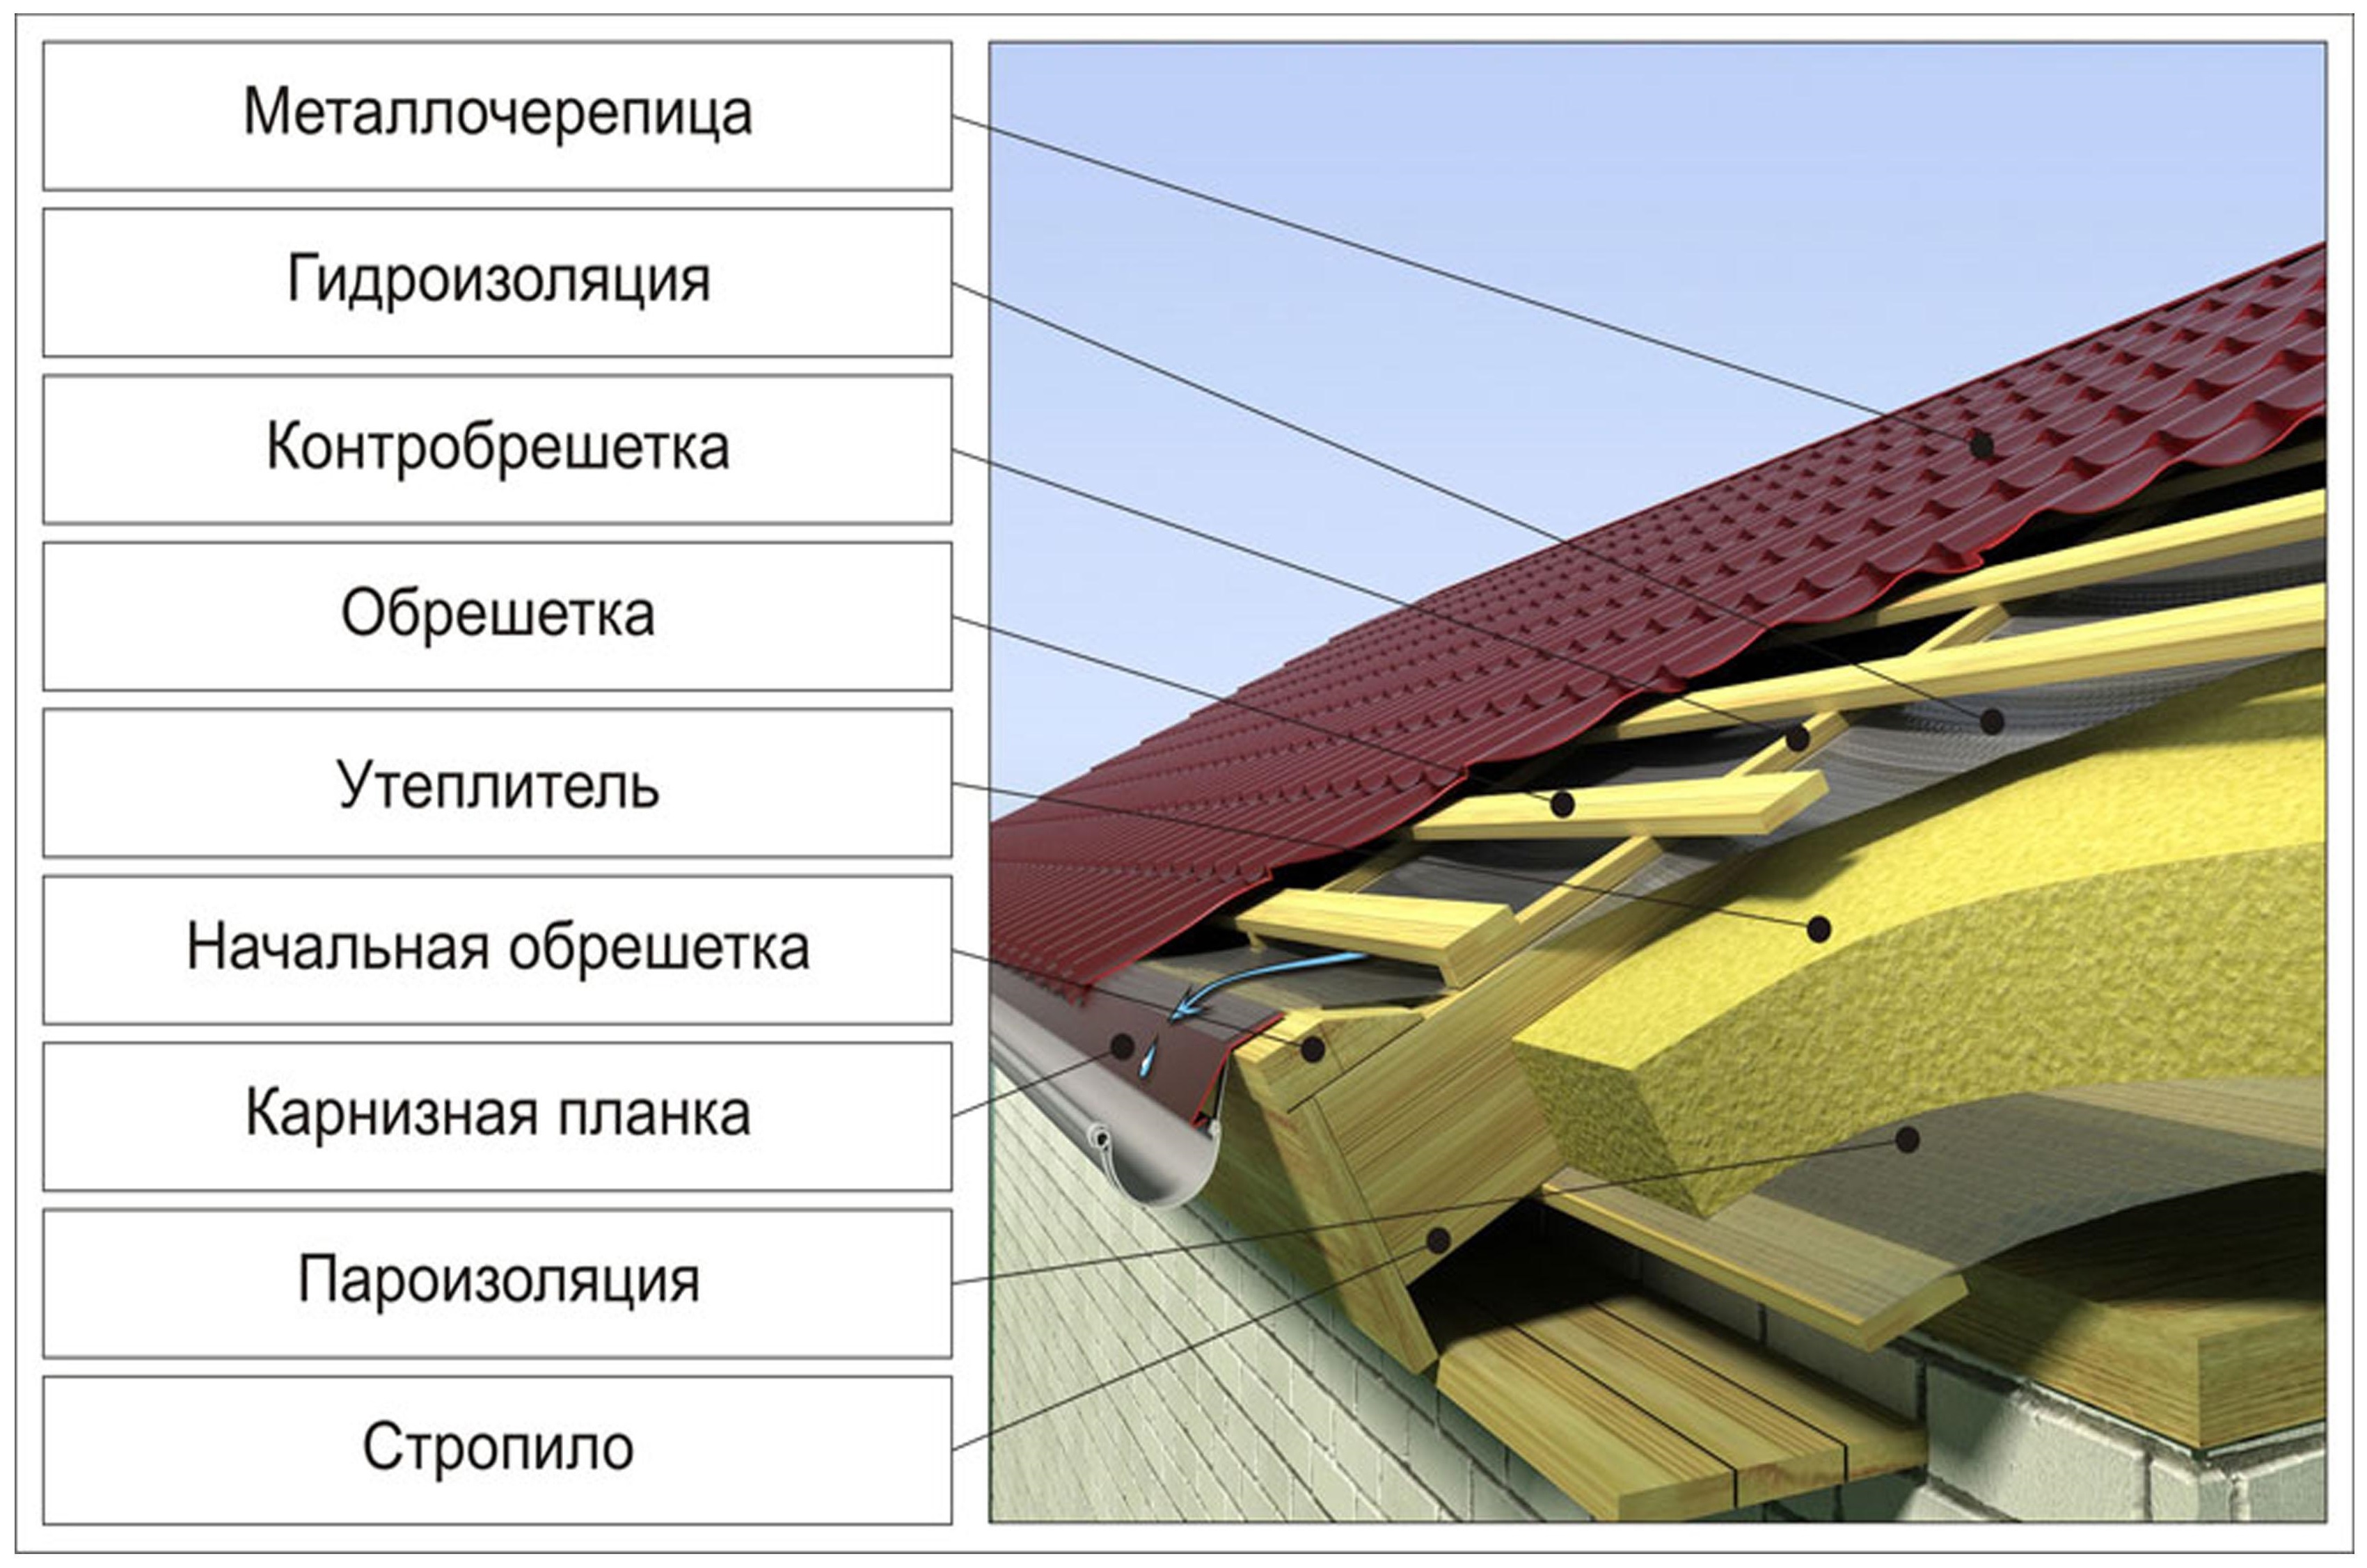
The composition of the cake of the insulated roof, starting from the attic:
- inner lining - lining, wall plastic panels, drywall, etc.;
- vapor barrier membrane;
- rafters with insulation laid between them (polystyrene, expanded polystyrene, mineral wool);
- waterproofing sheets, reinforced with a stapler and a 40x40 mm bar;
- crate made of boards;
- metal tile.
In the case of a cold attic, the sequence of layers is as follows:
- rafters;
- vapor barrier nailed with a stapler and a bar;
- transverse lathing;
- metal tile.
The counter-lattice bar creates gaps between the vapor or waterproofing and the topcoat so that air can circulate freely and moisture does not accumulate.
Surface preparation for the installation of metal tiles
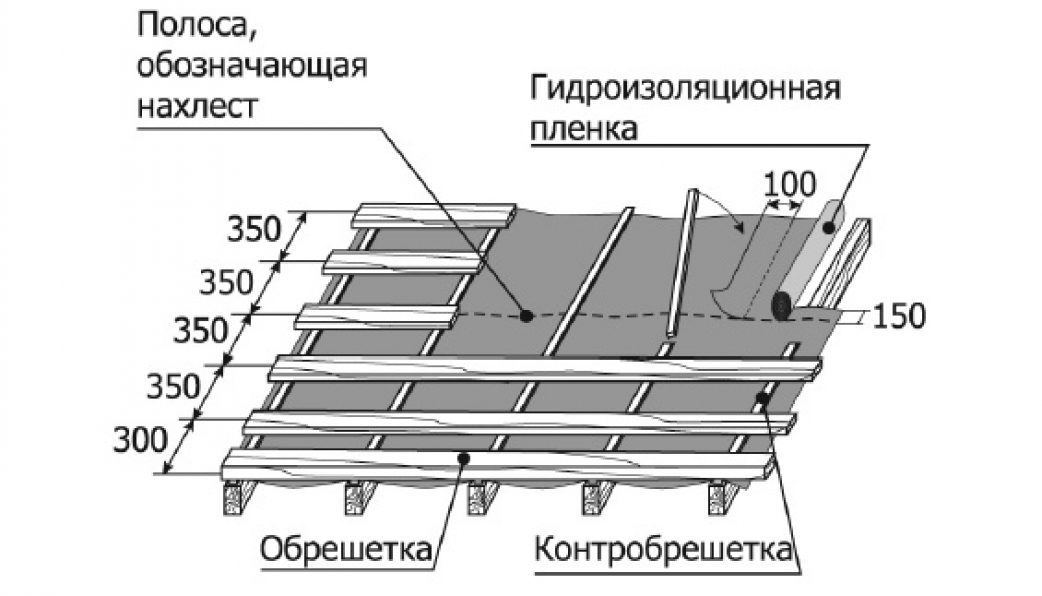
If the distance between the rafters is standard 60–80 cm, then boards 25 mm thick and 100–150 mm wide are used for the lattice. In cases where the rafters are located at large distances, then lumber with a thickness of 32 or 50 mm is chosen for the frame.
The step of laying the boards is selected based on the wavelength of the metal tile. For standard sheets, the required distances are collected in a table.
| Shear wave length, mm | Distance from the bottom to the second lathing board, mm | Distances between other boards, mm |
| 300 | 230 | 300 |
| 350 | 280 | 350 |
| 400 | 330 | 400 |
The upper bar is nailed "in place", focusing on the distances obtained.
Step-by-step instructions for installing the crate
It is necessary to mount the sheathing boards on the laid waterproofing membrane. The material is nailed to the rafters with a stapler.
The work is carried out in the following sequence:
- The lower bar must be screwed on with self-tapping screws strictly at the level of the rafters, it should not protrude beyond the overhang.
- The second board is fixed at a distance according to the second column of the table.
- Next, the step is chosen exactly the same as the size of the wave.
- For 30–40 cm to the top of the ridge of the gable roof, the boards are laid close to each other, thus strengthening the frame.
- A continuous lattice should be performed in the places where valleys, windows, abutments, overhangs are located.
It is undesirable to use nails for fastening the lathing, since due to temperature deformation, which is different for wood and metal, the fasteners will gradually protrude from the boards and damage the metal tile.
After the crate is laid, the plane is checked, if deficiencies are noted, a correction is made by laying a piece of wood of the required thickness between the board and the rafters.
Installation of parts before laying metal tiles
Installation of eaves and overhangs filing
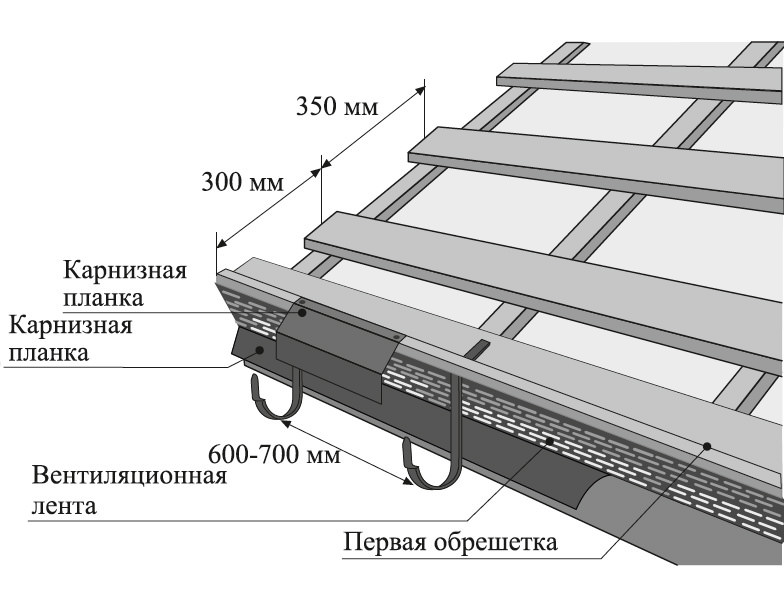
The cornice strip is made of steel 0.4–0.5 mm and corresponds in color to the main roofing material.
Sequencing:
- The frontal board is mounted by attaching it to the end of the rafters.
- A support bar for filing is attached to the wall of the house.
- The overhang is sewn up with a grooved board or metal profiled sheet.
- Mount brackets for the drainage system.
- Install the cornice bar over the drainage fixture.
The step of fastening the planks with self-tapping screws is 30–40 cm. If it is necessary to lay two cornice elements, an overlap of 10–15 cm is made.
Installation of the valley
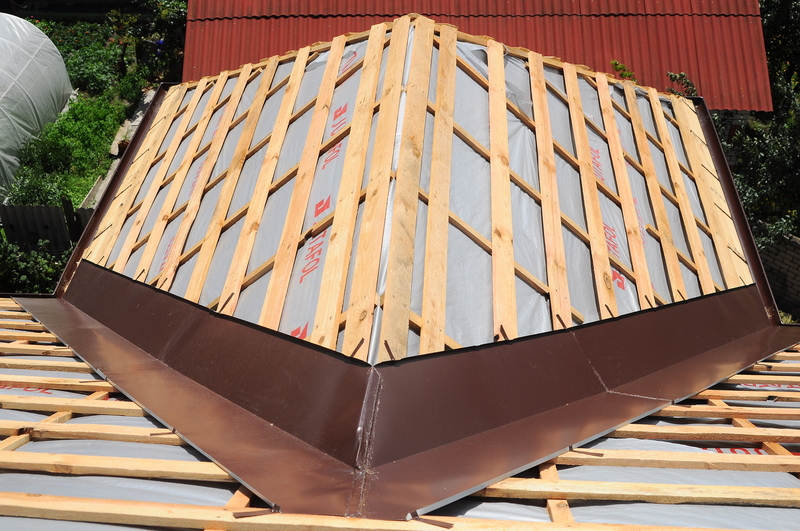
Details are installed on the ridge of a gable, hip and sloping roof, as well as in the inner corners of the joining of the slopes.
If the corners do not match the configuration of the parts, they are corrected with a rubber mallet.
The valley is fixed with self-tapping screws with heads in the form of a press washer.
Installation of the abutment bar
Before the installation of the tiles, the lower abutment strips are installed. One side is fixed to the wall with self-tapping screws, the other to the sheathing boards.
The part has a flange to maintain the overall level of the topcoat.
Rules for stacking sheets
There are two options for laying metal tiles:
- the length of the sheets corresponds to the length of the slopes;
- use sheets of arbitrary length, joining them in a cascade.
In most cities, you can order sheets of metal tiles up to 9 meters long.
Sheets to size
Precision-made parts do not need to be cut to fit, and there is no waste left, which reduces the cost of roofing.
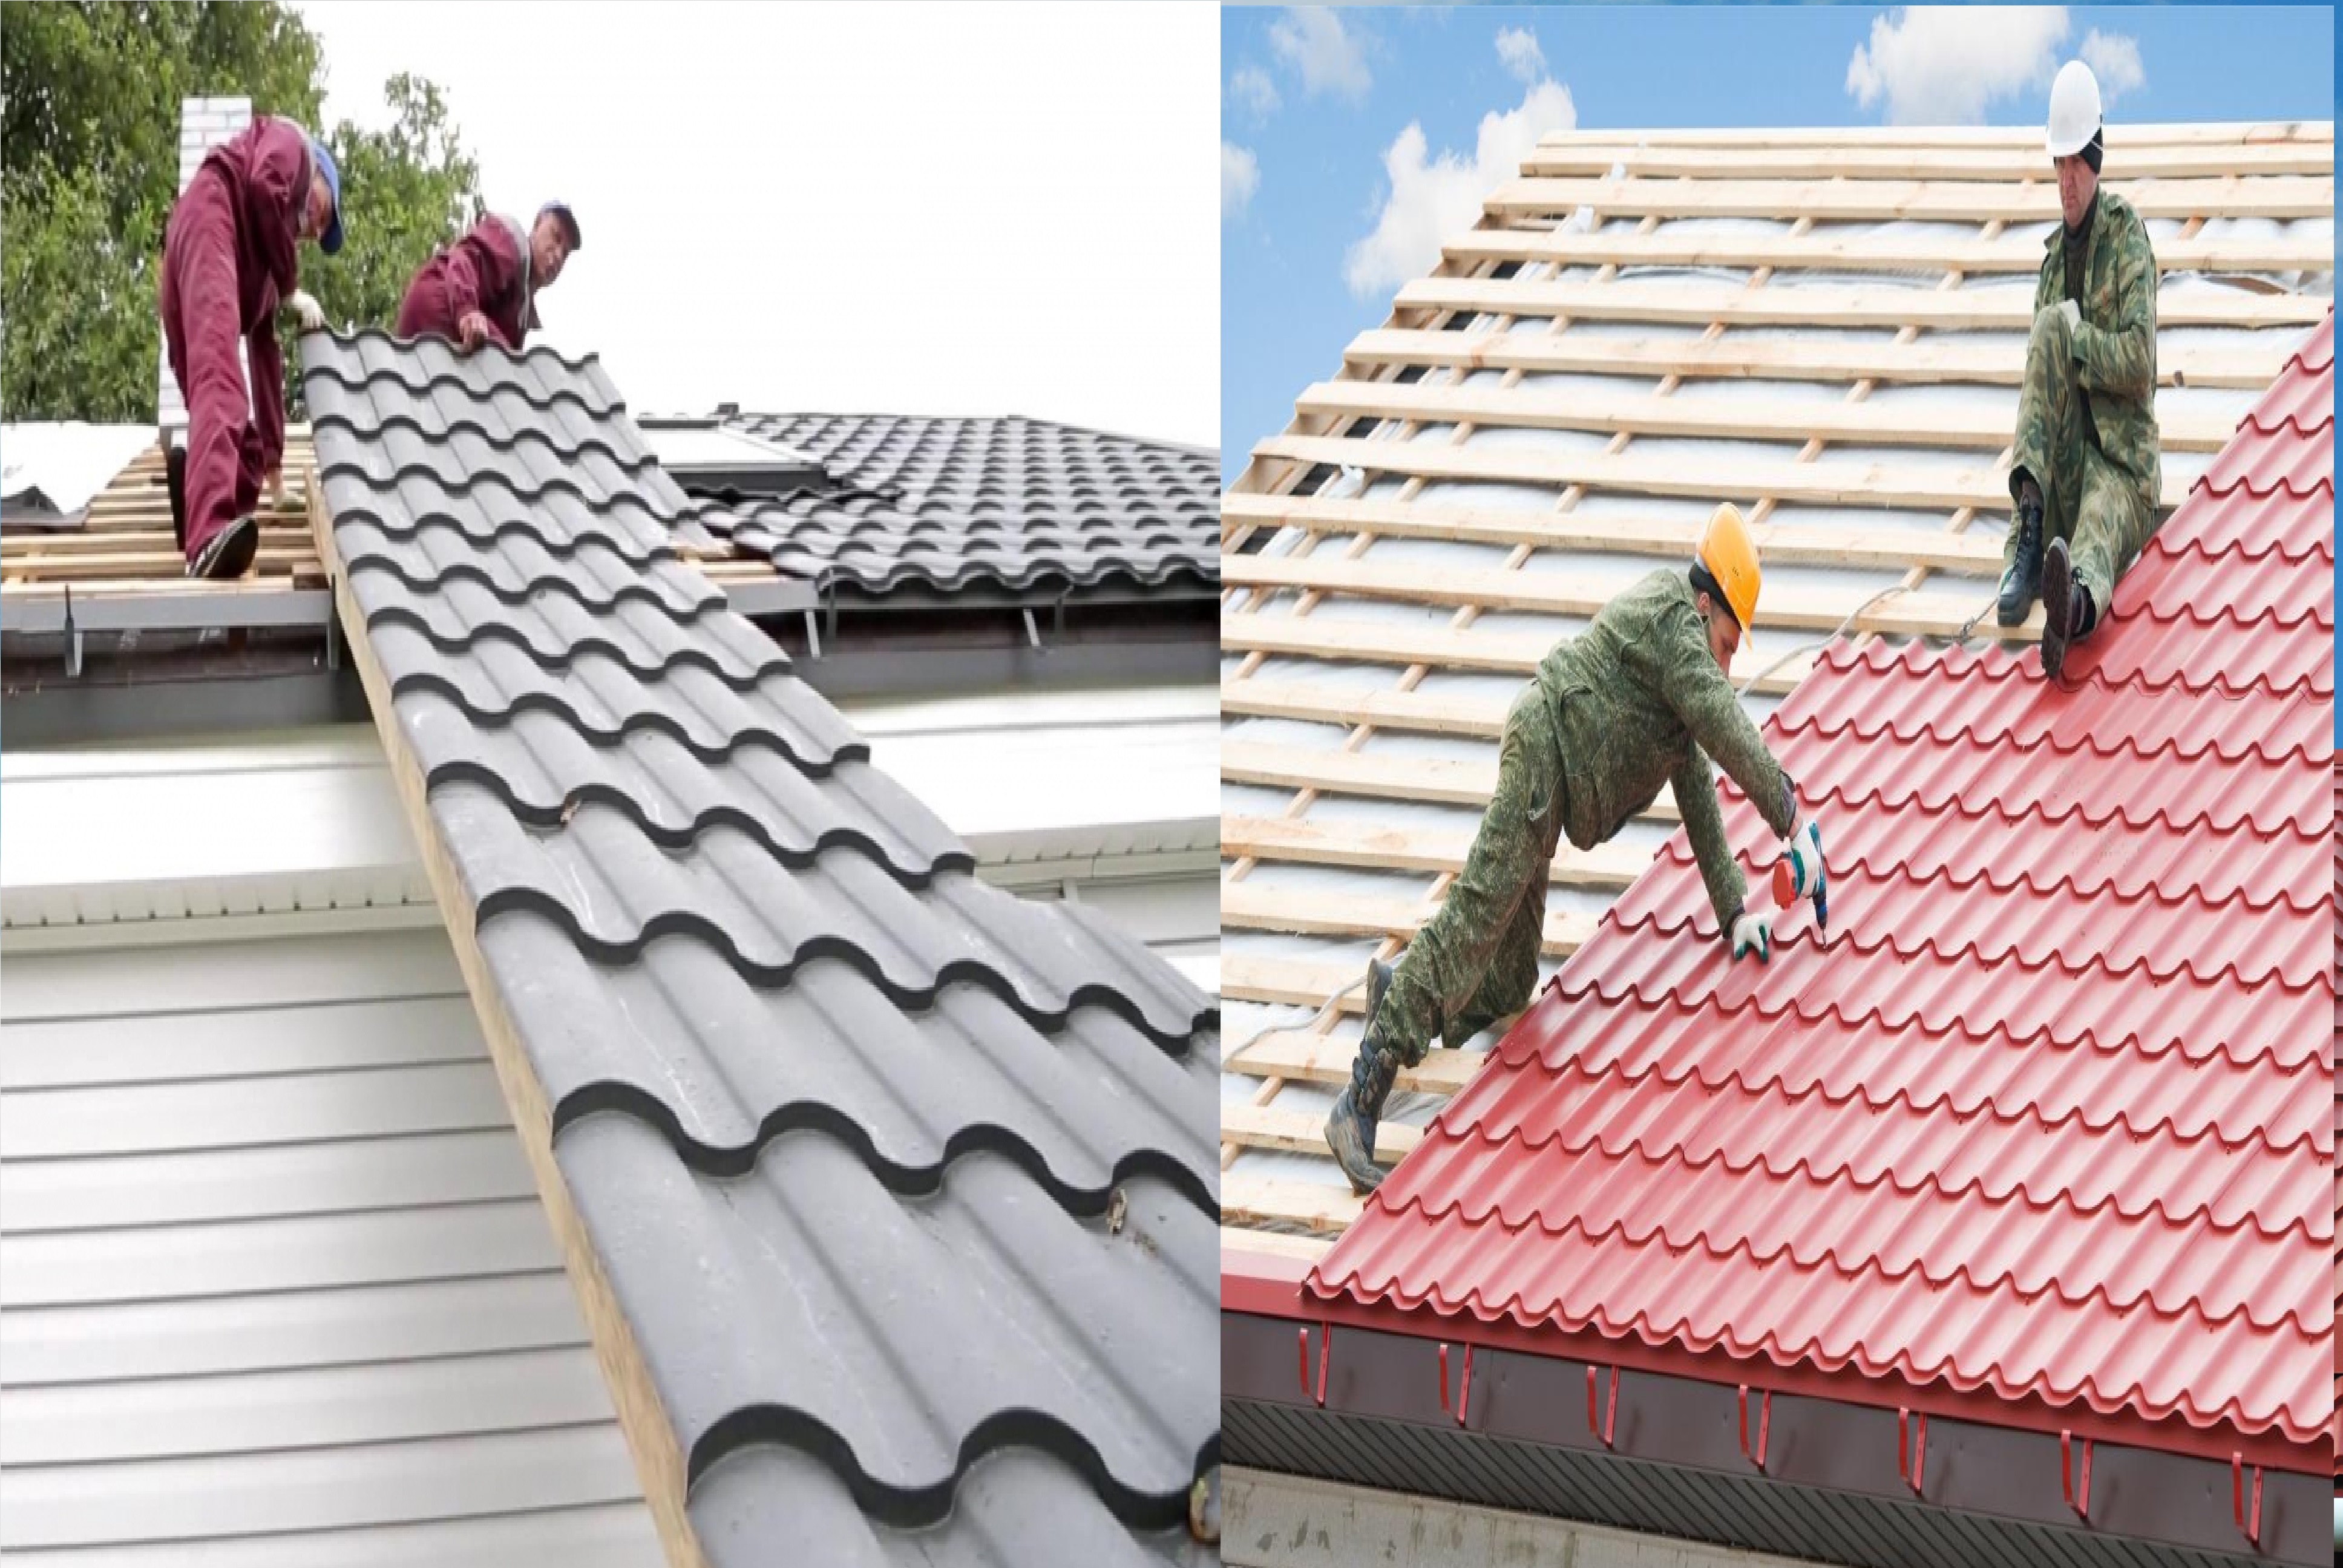
They start to lay on the right edge. The sheet is aligned along the lines of the end and lower overhang. The lower edge of the sheet should protrude 50 mm beyond the eaves so that precipitation falls into the drain. After alignment, the sheet is fixed in the area of the ridge and the position is adjusted. Then fixing is carried out according to the self-tapping scheme.
If the laying is carried out from right to left, each subsequent sheet is placed with an overlap on the previous one. Otherwise, the edge of the second sheet is placed under the first.
The sheets are connected to each other in different ways: in a wave crest or in a step. Information on the correct fastening of a specific model is specified when purchasing the material.
To cover metal tiles on a triangular roof, they begin from the center to the edges, observing the overlap pattern.
If the sheets are shorter than the slopes
If you have to dock the sheets along the length, use a different layout scheme. You need to start with the two bottom elements, then one sheet above the first. The next steps are performed in the same way: one sheet to the bottom row, the next to the top.
This layout allows you to maintain the plane of the surface and minimize the likelihood of moisture getting under the roof.
Features of covering one- and two-pitched roofs.
The difference in the installation of the coating on roofs with a different number of slopes lies in the design of the places where the tiles adjoin to the sheathing. On a pitched roof, the lower overhang and the upper side are framed with a visor strip. At the same time, the top of the gable roof is protected by a ridge element.
On single-slope options, special attention is paid to the framing of the upper cut, since in this place it is possible for rain to overwhelm with a certain wind direction.
Fixation of metal tiles
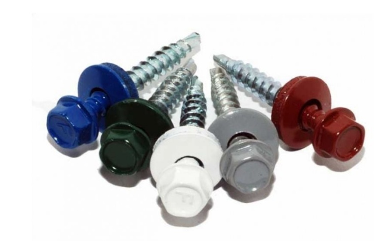
Fixation is carried out with roofing screws, choosing fasteners of the same color as the main elements. The size of the hardware is 4.8x28 or 4.8x35 mm. The choice depends on the configuration of the sheets (wave depth) and the thickness of the sheathing boards.
Along the perimeter of the sheets and at the joints, self-tapping screws are screwed into each wave. The central part is fixed through two waves vertically and through one or two horizontally.
The installation of self-tapping screws is carried out strictly at an angle of 90 degrees. Otherwise, water will flow under the cap, and a dent will remain at the attachment point. It is necessary to twist until the rubber gasket is flattened by half.
Modular roof tiles
The modular version differs from sheet models in that a standard sheet in width has from 1 to 3 waves in the vertical plane. Each part is equipped with a locking element.
The details are fastened with self-tapping screws installed secretly, which improves the appearance, makes the roof practically invulnerable to the penetration of moisture from precipitation.
The lock area is closed with the next sheet, which allows the use of self-tapping screws without gaskets. They are screwed tightly to the metal.
Final work
After laying all sheets of metal tiles, proceed to the final stage of work:
- fasten the pediment strips, hiding the gap and giving the building an attractive appearance;
- ridge elements are attached;
- the upper valleys are installed at the junctions of the roof to the vertical surfaces and at the junctions of the slopes.
Carry out a control examination and tint the cuts to prevent corrosion.
Common mistakes
Inexperienced installers make some of the most common mistakes when installing metal tiles, which can lead to unreasonable costs of money and labor:
- calculation and cutting of material according to the project, and not according to real dimensions;
- self-delivery of material to the construction site without factory packaging, is fraught with the seller's refusal to replace crumpled parts;
- improper unloading, for example, removing sheets by dragging, which leads to scratches or destruction of the protective layer;
- incorrect calculation of the material, if carried out independently, errors are possible;
- installation without precise leveling of the battens;
- cutting sheets with a grinder;
- fastening screws in the upper part of the wave;
- use of polyurethane foam to seal voids revealed during installation.
Correctly installed elements make the roof reliable and waterproof. The service life can be up to 50 years.


