Composite roof - multi-gable, on a house with an extension, with a veranda, includes both external and internal corners. The first ones are closed with a skate, this element is familiar to anyone, even a novice builder. However, when the ramps are joined along, an inner corner appears. He also needs protection and strengthening.
What is an endova and what is it used for

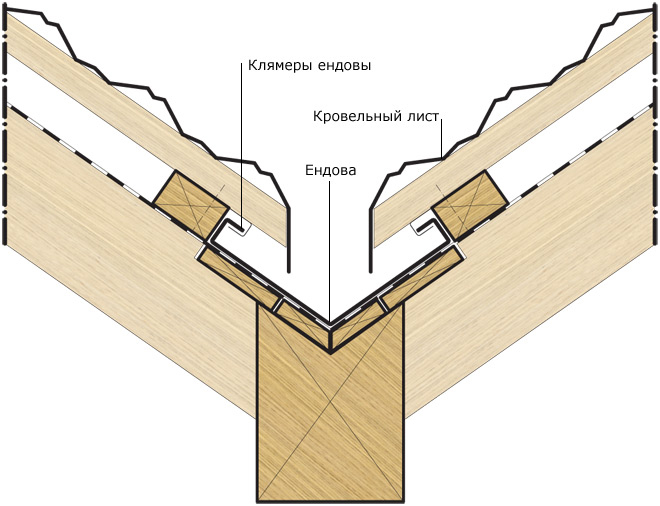
Endova for roofs made of slate, metal tiles are a part that protects the inner corners from water getting into them. The device of a valley for a roof made of metal is more complicated than that of a ridge:
- lathing - solid, fits at the level of the common lathing;
- the lower plank is actually a groove, the inner corners of the roof are brought out here when laying;
- the outer strip is a decorative element that covers the ugly joint between the metal tile.
Installation is carried out as the roof is being built. Since the structure serves as a drain, all seams and joints during its installation are sealed with a sealing tape.
The dimensions of the valley depend on the dimensions of the groove. The more difficult the weather conditions in the region, the wider it is made. The length of the plank is standardized - 2 m. Variants are produced in 3 m length. If the gutter is to be longer, it is laid out from overlapping planks.
Endows provide the following benefits:
- drain melt and rainwater from the roof;
- improve the removal of snow - it crumbles in small lumps, and not in layers;
- assembling them is simple, does not require skills or special tools.
Finishing strips are produced in the same color range as metal tiles, so it's easy to choose the right shade.
Varieties of valleys
Endova for metal tiles are of 2 types.
- Internal - or open, consists only of the lower bar. It has upward curved edges. When draining, water does not fall under the roof.
- Endova for metal tiles - closed, consists of 2 elements. Here, in addition to the lower one, there is also an upper plank that covers the roof joint. In addition to covering the seams, the outer plank prevents debris from accumulating in the joints and from rotting.
The installation of a closed gutter is somewhat more complicated. It is recommended for use on steep slopes.
Gutters are made of aluminum, galvanized steel, copper, iron with a polymer coating. Copper strips are more expensive, but they are absolutely not afraid of corrosion and are very beautiful.
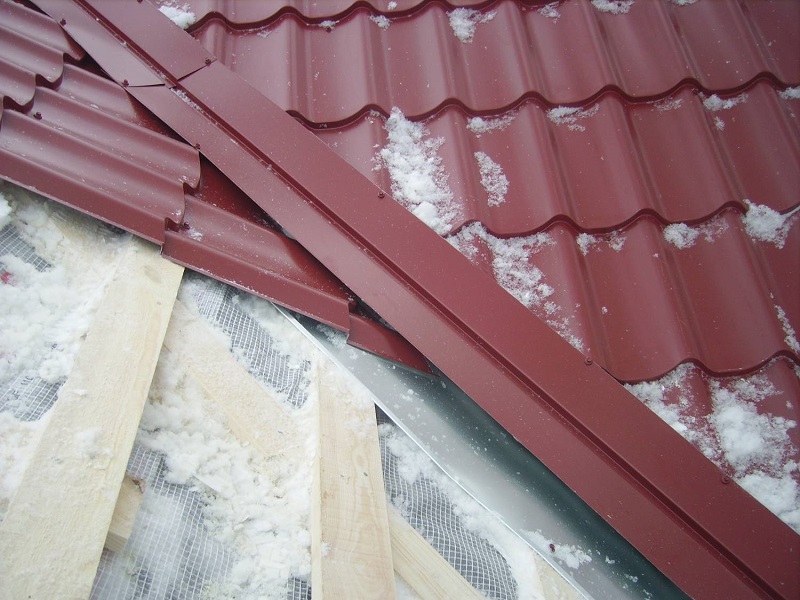
Features of assembling the valley with metal roofing

Installation of the valley with metal roofing is carried out according to the following instructions.
- A continuous crate is placed along the border of the inner fracture. The angle corresponds to the angle between the touching ramps. The value of the angle is determined by the angle of the joint of the slopes. The lathing prevents the roof from sagging and serves as a strong base for the gutter, therefore it is made of medium-hard wood.
- Waterproofing is laid on top of the wooden lathing.
- End boards are attached to the crate on both sides. They do not touch each other.
- In the resulting corner, the internal valley for the metal tile is fixed on the boards. Fasteners - galvanized self-tapping screws. If the length of the strips is not enough, the latter are overlapped along the length by 10-15 cm. The joints of the fragments are sealed.
- Cutted roof sheets are laid on top with an overlap. There should be a gap between the edges.Fasten metal tiles with roofing nails.
- Mount the top bar so that it covers the joint. The finished unit is fixed with hardware.
If the weather is changeable in winter and there is a high risk of ice crust formation, you can install a gutter heating. To do this, take a heating cable.
Tools and materials for installation
To install a valley under a profiled sheet or metal tile, you will need the following:
- boards for lathing;
- waterproofing film;
- upholstery cord, gaskets;
- galvanized self-tapping screws;
- screwdriver, hacksaw or metal cutting machine, roofing knife;
- spatula, hammer;
- construction hair dryer;
- ruler, level, tape measure.
It is recommended to take self-tapping screws with rubber pads, since such fasteners do not allow moisture to pass through.
Features of the rafter system
A roof structure with internal corners requires reinforcement.
- At the junction of 2 slopes, a rafter leg is installed. With a long length, it is reinforced with metal plates.
- Under high load, the leg rests on the jib in a wide place.
- The end strip for metal tiles is placed on 2 intermediate strips - end boards. Their length is greater than the width of the lower valley part.
The color of the upper bar is selected either in the same shade or in a contrasting one.
Valley Tips
When the groove is installed, adhere to the following recommendations.
- Some manufacturers advise not to make holes in the bottom bar, so as not to reduce the drainage efficiency. You can attach the valley to the bends through the attached strips-ears.
- The waterproofing under the grooves is connected to a common adhesive tape.
- The lathing can be assembled from horizontal strips arranged in a checkerboard pattern.
Sealing and sealing strips are used at the joints of the roof and the gutter.


